
New Releases |
Hidden Object Games |
Match 3 Games |
Time Management Games |
Strategy Games |
Puzzle Games |
Card Games |
Action Games |
Word Games
Otherworld: Omens of Summer Walkthrough 9

Otherworld: Omens of Summer Walkthrough 9
* OS: Windows 7 / Vista / XP
* CPU: Pentium 3 1.0 GHz or Higher
* OS: Windows 7 / Vista / XP
* CPU: Pentium 3 1.0 GHz or Higher
Otherworld: Omens of Summer Walkthrough 9
* OS: Windows 7 / Vista / XP
* CPU: Pentium 3 1.0 GHz or Higher
* OS: Windows 7 / Vista / XP
* CPU: Pentium 3 1.0 GHz or Higher
Otherworld: Omens of Summer Walkthrough 9 Screenshots, Videos:

Follow our crystal clear walkthrough and helpful tricks to get you through the rough spots! Click the button to download full walkthrough.
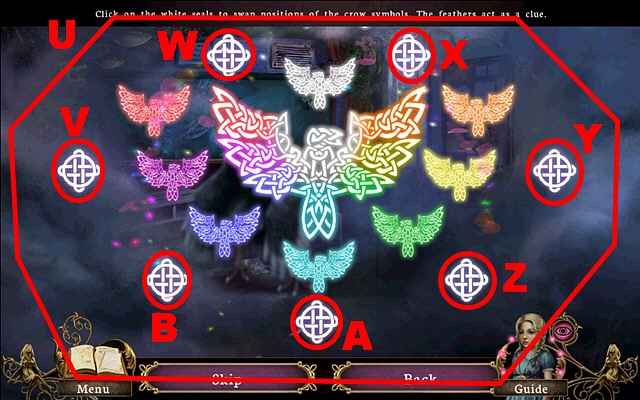
To solve this puzzle (U), press the white seals to swap the crow emblem's positions. The colors of the crow's feathers indicate the correct placements. The crow emblems' positions are randomized on start so your solution may vary.
A sample solution has been attached, where the white seals are pressed in the following sequence: W, Y, X, V, W, Z, Y, X, W, V, B, Y, and Z.
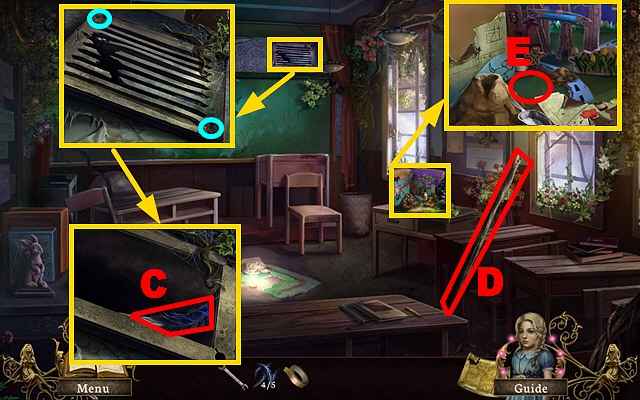
Zoom into the air vent and remove the 2 bolts marked in blue with the WRENCH; remove the grate and take the 5/5 FEATHER (C).
Take the STICK (D).
Zoom into the diorama; put down the TAPE (E).
Play the HOS.
Pull down the paper and take the house (F).
Crack the egg and take the soccer ball (G).
Open the window, take the poster piece (H), put it next to the other poster piece (I), use the tape to fix the pieces, take the new piece, connect it to the poster half (J), and take the fixed poster.
Put the clay (K) on the volcano (L).
Pour the baking soda, the red dye, and the vinegar (all marked in purple) into the volcano.
Take the lava from the volcano.
Pull down the monkey (M).
Take the paper handle (N), connect it to the blade (held by the monkey), use the scythe to harvest the corn (O), and take the locker combination (P).
You will receive the LOCKER COMBINATION.
Walk down.
To solve this puzzle (U), press the white seals to swap the crow emblem's positions. The colors of the crow's feathers indicate the correct placements. The crow emblems' positions are randomized on start so your solution may vary.
A sample solution has been attached, where the white seals are pressed in the following sequence: W, Y, X, V, W, Z, Y, X, W, V, B, Y, and Z.
Zoom into the air vent and remove the 2 bolts marked in blue with the WRENCH; remove the grate and take the 5/5 FEATHER (C).
Take the STICK (D).
Zoom into the diorama; put down the TAPE (E).
Play the HOS.
Pull down the paper and take the house (F).
Crack the egg and take the soccer ball (G).
Open the window, take the poster piece (H), put it next to the other poster piece (I), use the tape to fix the pieces, take the new piece, connect it to the poster half (J), and take the fixed poster.
Put the clay (K) on the volcano (L).
Pour the baking soda, the red dye, and the vinegar (all marked in purple) into the volcano.
Take the lava from the volcano.
Pull down the monkey (M).
Take the paper handle (N), connect it to the blade (held by the monkey), use the scythe to harvest the corn (O), and take the locker combination (P).
You will receive the LOCKER COMBINATION.
Walk down.
Receive Emails When Otherworld Series Has New Game Released
Sign-up to get informed when the Otherworld series has new game released with BD Studio Games' FREE bi-weekly newsletter.
Sign-up to get informed when the Otherworld series has new game released with BD Studio Games' FREE bi-weekly newsletter.


 REFRESH