
New Releases |
Hidden Object Games |
Match 3 Games |
Time Management Games |
Strategy Games |
Puzzle Games |
Card Games |
Action Games |
Word Games
Nightmares from the Deep: The Siren's Call Walkthrough 15

Nightmares from the Deep: The Siren's Call Walkthrough 15
* OS: Windows 7 / Vista / XP
* CPU: Pentium 3 1.0 GHz or Higher
* OS: Windows 7 / Vista / XP
* CPU: Pentium 3 1.0 GHz or Higher
Nightmares from the Deep: The Siren's Call Walkthrough 15
* OS: Windows 7 / Vista / XP
* CPU: Pentium 3 1.0 GHz or Higher
* OS: Windows 7 / Vista / XP
* CPU: Pentium 3 1.0 GHz or Higher
Nightmares from the Deep: The Siren's Call Walkthrough 15 Screenshots, Videos:
Follow our crystal clear walkthrough and helpful tricks to get you through the rough spots! Click the button to download full walkthrough.
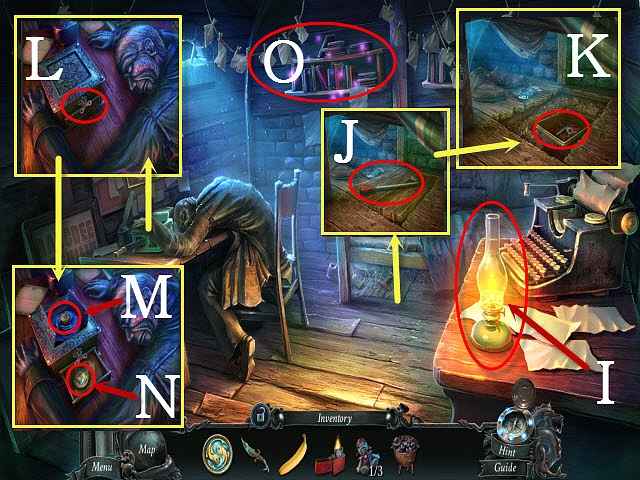
Use the LIGHTER on the lantern (I).
Move the sheet and look under the bed; move the two cobwebs and take the CRANE LEVER (J).
Move the two floorboards and the dirt; open the tin and take the WIND-UP KEY (K).
Examine the corpse and move the arm; place the WIND-UP KEY in the box slot and turn it (L).
Take the SIGNET RING (M) and the 3/12 GOLDEN FISH (N).
Examine the shelf to activate a HOP (O).
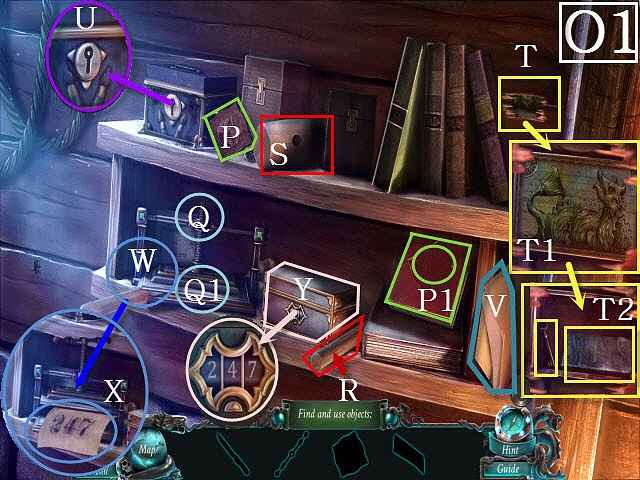
Find the listed items (O1).
Place the book symbol (P) on the book and take the handle (P1).
Place the handle on the letterpress; select the handle and take the knife (Q).
Use the knife on the hammer handle and take it (R); on the hammer head to receive the hammer (S).
Move the books and use the hammer on the crack (T); solve mini-game (T1) to get the fonts and the paint box key (T2).
Use the paint box key on the lock to get the printing ink (U).
Take the blank paper (V).
Place the fonts, the printing ink, and the blank paper on the letterpress (W); select the letterpress and look at the code (X).
Enter 247 to get the BOLTS (Y).
Return to the Secret Chamber.
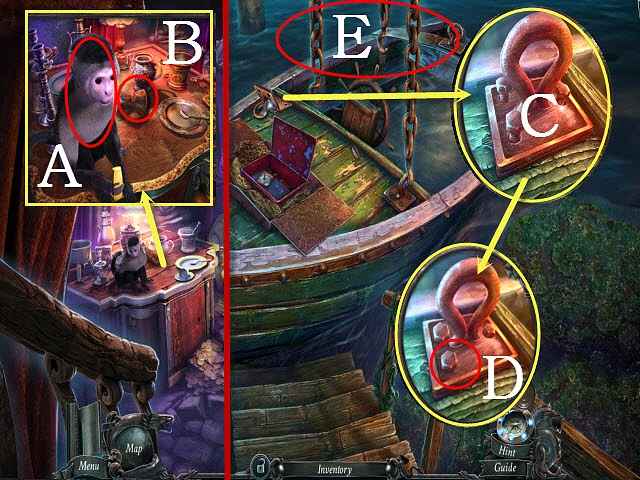
Examine the monkey; give him the BANANA (A).
Take the FIREPROOF GLOVE (B).
Return to the Dilapidated Harbor.
Examine the ring; move it and place the BOLTS on it (C).
Use the WRENCH on the three bolts (D).
Select the three chains (E).
Walk down; examine the controls to activate a puzzle.
Use the LIGHTER on the lantern (I).
Move the sheet and look under the bed; move the two cobwebs and take the CRANE LEVER (J).
Move the two floorboards and the dirt; open the tin and take the WIND-UP KEY (K).
Examine the corpse and move the arm; place the WIND-UP KEY in the box slot and turn it (L).
Take the SIGNET RING (M) and the 3/12 GOLDEN FISH (N).
Examine the shelf to activate a HOP (O).
Find the listed items (O1).
Place the book symbol (P) on the book and take the handle (P1).
Place the handle on the letterpress; select the handle and take the knife (Q).
Use the knife on the hammer handle and take it (R); on the hammer head to receive the hammer (S).
Move the books and use the hammer on the crack (T); solve mini-game (T1) to get the fonts and the paint box key (T2).
Use the paint box key on the lock to get the printing ink (U).
Take the blank paper (V).
Place the fonts, the printing ink, and the blank paper on the letterpress (W); select the letterpress and look at the code (X).
Enter 247 to get the BOLTS (Y).
Return to the Secret Chamber.
Examine the monkey; give him the BANANA (A).
Take the FIREPROOF GLOVE (B).
Return to the Dilapidated Harbor.
Examine the ring; move it and place the BOLTS on it (C).
Use the WRENCH on the three bolts (D).
Select the three chains (E).
Walk down; examine the controls to activate a puzzle.


 REFRESH